Java - Linked List 구현
이번 포스팅은 Collection변수인 Linked List Datastructure에 대해서 포스팅해보겠습니다.
실제로 캐시에 대해서 구현하고 있는데 캐시의 데이터 저장부분을 구현하려다보니 Linked List를 알아야하더라구요...
그래서 이번 기회로 Linked List의 구조에 대해서 꼼꼼히 살펴보고 다음 포스팅은 Double LinkedList로 해보겠습니다.
❓ Linked List란?
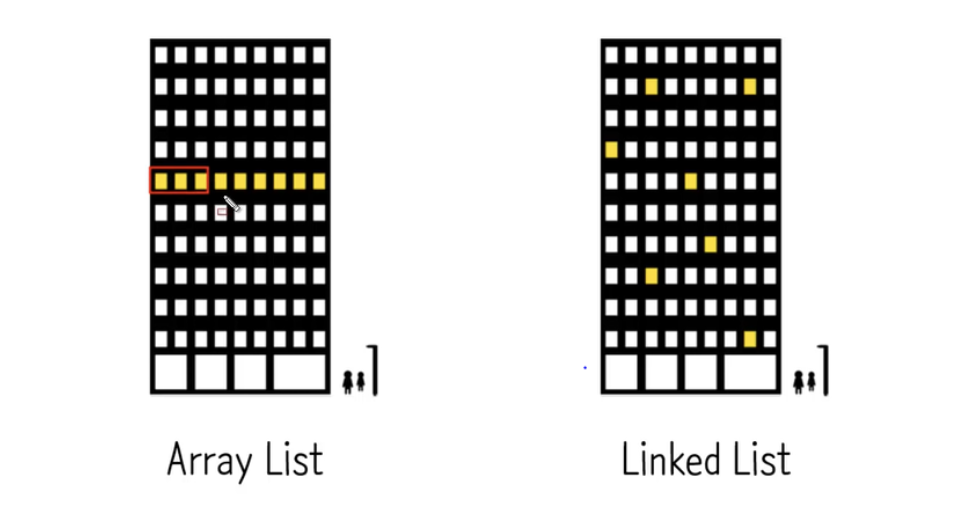
List를 표현하는 데이터 스트럭쳐. ArrayList와 LinkedList가 있습니다.
ArrayList는 각각의 데이터들이 붙어있습니다. 즉 인덱스가 정해져 있습니다.
LinkedList는 각각의 데이터들이 흩어져있다. 이것들이 서로 연결되어있습니다.
어떻게 연결될까요? Node 또는 Vertex를 이용합니다. 한 개의 노드에는 Data field, Link field가 있습니다.
말 그대로 Data field는 현재의 Node 데이터를 나타내고 Link field는 다음 Node데이터를 가르키고 있습니다.
🏗️ LinkedList의 구조
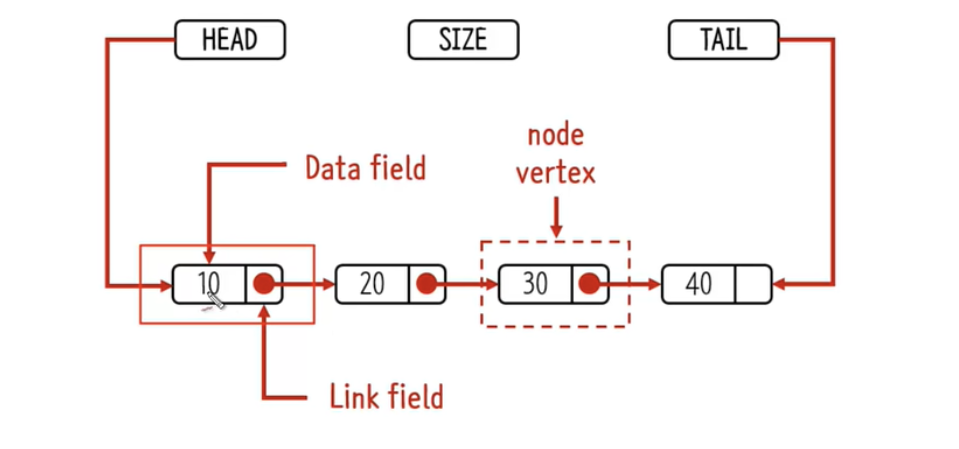
위의 그림과 같은 구조로 되어있습니다.
일단 크게 Head와 Tail과 Size를 지정해줘서 끝과 시작이 어딘지 몇 개가 들어갈건지를 정해줍니다.
다음에 LinkedList안에 Node라는 클래스를 하나씩 만들어줍니다.
Node안에는 data와 next data의 정보가 들어가있습니다. 아래는 위의 구조를 코드로 나타내었습니다.
public class LinkedList {
    private Node head;
    private Node tail;
    private int size = 0;
    private class Node {
        private Object data;
        private Object next;
        public Node(Object input) {
            this.data = input;
            this.next = null;
        }
        public String toString() {
            return String.valueOf(this.data);
        }
    }
}
🧭 LinkedList 메서드 구현
1. addFirst : LinkedList에 첫 번째 노드를 생성해줍니다.
addFirst는 newNode를 생성해줍니다. 그리고 newNode는 head가 되어야합니다.
그 다음 newNode의 nextData는 노드 생성 전 head값을 가르키게 하면 됩니다.
public void addFirst(Object input) {
        Node newNode = new Node(input);

        newNode.next = head;
        head = newNode;
        size++;
        if(head.next == null){
            tail = head;
        }
    }
2. addLast : LinkedList에 마지막 노드를 생성해줍니다.
addLast는 newNode를 생성해줍니다. 그리고 newNode가 tail이 되어야합니다.
원래 tail이던 값의 nextData는 newNode를 가르키게 하면 됩니다.
public void addLast(Object input) {
        Node newNode = new Node(input);
        if (size == 0) {
            size++;
            addFirst(input);
        } else {
            tail.next = newNode;
            tail = newNode;
            size++;
        }
    }
3. add : 특정 원하는 위치에 Node를 더해줍니다.
특정 위치(k)에 Node를 더해줘야합니다. 그럼 k-1위치의 Node를 찾아줍니다. 그리고 (k-1)Node의 nextData값을
newNode로 지정해주시면 됩니다. 그리고 newNode의 nextData값을 원래 (k-1)Node의 nextData값으로 지정
해주시면 됩니다. 그리고 마지막에 newNode.next값이 null인 경우는 tail이기떄문에 tail로 지정해줍니다.
public void add(int k, Object input) {
        if (k == 0){
            addFirst(input);
        } else {
            Node x = node(k - 1);
            Node x_next = (Node) x.next;
            Node newNode = new Node(input);
            x.next = newNode;
            newNode.next = x_next;
            size++;
            if (newNode.next == null)
                tail = newNode;
        }
    }
4. remove : 특정위치의 값을 제거해줍니다.
(k-1)Node를 가져옵니다. 그리고 (k-1)Node의 nextData값을 (k+1)Node를 가르키게 합니다.
그 다음 k값은 삭제해야하므로 리턴을 위해 값을 저장하고 null을 넣어줍니다.
public Object remove(int k) {
        Node node = node(k - 1);
        Node todoDeleted = (Node) node.next;
        node.next = ((Node) node.next).next;
        Object returnData = todoDeleted.data;
        if (returnData == null)
            tail = node;
        todoDeleted = null;
        size--;
        return returnData;
    }
5. indexOf : data가 몇 번째 위치에 있는지 알려줍니다.
처음에는 헤드부터 시작하여 data가 있는 곳의 index를 찾아 반환해줍니다.
public int indexOf(Object data) {
    Node temp = head;
    int index = 0;
    while(temp.data != data) {
        temp = (Node) temp.next;
        index++;
        if(temp == null)
            return -1;
    }
    return index;
}
🔧 LinkedList의 Iterator사용
LinkedList에서 Iterator를 왜 사용할까요? 일단 LinkedList의 가장 큰 단점이 뭐였죠?
자신의 데이터들의 위치를 기억하지 못하는 단점이있습니다.
그래서 이러한 부분을 완전히는 아니고 부분적으로 효율적으로 사용 할 수 있도록 만든 것이 Iterator입니다.
이것은 ArrayList처럼 특정 위치를 기억하지는 못해도 순차적인 시퀀스를 진행 할 때 유용합니다.
예를 들어 1,2,3,4숫자를 조회하는 기능을 구현 할 경우 Iterator를 쓰지 않으면 조회 할 때마다 처음부터 for문으로 조회해야합니다.
그러나 Iterator는 2까지 세었으면 2와 다음 Data를 기억하고 있기 때문에 효율성이 좋습니다.
설명보다는 코드로 보시면 더욱 와닿을 수 있습니다. Iterator의 기본 구조에 대해서 살펴보겠습니다.
    public class ListIterator {

        private LinkedList.Node next;
        private LinkedList.Node lastReturned;
        private int nextIndex;

        ListIterator() {
            next = head;
        }
}
위와 같이 LinkedList내부적으로 ListIterator라는 클래스를 지니고 있습니다.
첫 번째 next변수는 초기화 될 경우 head를 가르키고 next()메소드를 호출 할 때마다 한 칸씩 이동해 위치를 기억합니다.
두 번째 lastReturned는 next변수 바로 전의 값을 저장하고 있습니다.
마지막 nextIndex는 next가 가리키고 있는 인덱스를 알려줍니다.
1. next, hasNext : 순차적으로 데이터를 읽고 저장합니다. 다음에 데이터가 있는지 확인해줍니다.
public Object next() {
    lastReturned = next;
    next = (LinkedList.Node) next.next;
    nextIndex++;
    return lastReturned.data;
}

public boolean hasNext() {
    return nextIndex < size();
}
2. add : lastReturned와 next의 중간에 newNode를 더해줍니다.
newNode를 생성해줍니다. lastReturned의 nextData를 newNode를 가르키게합니다.
newNode의 nextData는 next를 가르키게 합니다. 마지막으로 lastReturned를 newNode를 가르키게합니다.
public void add(Object input){
      LinkedList.Node newNode = new Node(input);
      if (lastReturned == null) {
          head = newNode;
          newNode.next = null;
      } else {
          lastReturned.next = newNode;
          newNode.next = next;
      }
      lastReturned = newNode;
      nextIndex++;
      size++;
  }
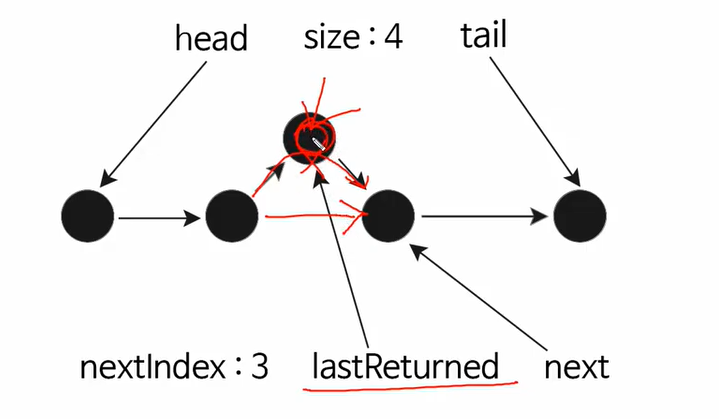
3. remove : lastReturned의 Node를 삭제합니다.
remove는 이해가 잘 안되어 사진을 가져왔습니다. 일단 우리는 lastReturned값을 삭제해야합니다.
그러나 lastReturned의 전 값을 알 수 없습니다. 그래서 처음부터 for문을 이용하여 찾아야합니다.
이것이 LinkedList의 단방향성의 큰 문제점입니다. 이것을 보완한 것이 DoubleLinkedList(양방향성)입니다.
그렇게 되면 prev의 nextData를 바로 next변수를 가르키게하면 됩니다.
public void remove() {
      if (nextIndex == 0) {
          throw new IllegalStateException();
      }
      LinkedList.this.remove(nextIndex-1);
      nextIndex--;
  }
이렇게 LinkedList Collection의 Datastructure를 알아봤습니다. LinkedList는 생성과 삭제에 유용하게 사용됩니다.
조회기능은 ArrayList가 훨씬 빠릅니다. 그래서 적재적소에 맞게 Collection을 사용해서 쓰면 되겠습니다.
저는 Cache구현을 위해 DoubleLinkedList까지 학습을해서 포스팅하도록 하겠습니다.
긴 글 읽어주셔서 감사합니다.